The week kinda got away from us and we didn't get get around to posting so it's time to play catchup. This phase of the renovation is not quite as visually dramatic as the addition in phase 1. We certainly don't have a dozen guys with saw, drills and hammers arriving in the ungodly early morning hours. There is much more "quiet" time with this project. Of course, we don't have a major deadline like an upcoming wedding like last time either.
Most of the work the second half of this week centered around electrical and media cabling in the media room. They first tackled the electrical needs. They added new above the counter outlets in the cabinet nook and prepped for the addition of LED lighting inside the upper cabinets as well as under cabinet LED lighting both operated by a single switch. Outlets were also added to the kegerator nook, one for the kegerator and one with a switch for future lighted signs. They also added the can light for the new celing of the kegerator nook. Outlets were also added to where media components will be.
 |
| This is the cabinet nook where you can see how they had to cut the drywall to run electrcity. |
They were back on Friday to run the media cables. Andy had spent a lot of time measuring and locating where he wanted everything. That included speaker wiring for the seven speakers, RG6 for the two subwoofer locations, two hdmi cables and two cat6 cables across the room and moving the location of the existing speaker wiring for the outdoor speakers. They thought that they could knock it out in half a day. Well, it did not happen they way they expected. But they persisted and had all the cables ran by the end of the day.
 |
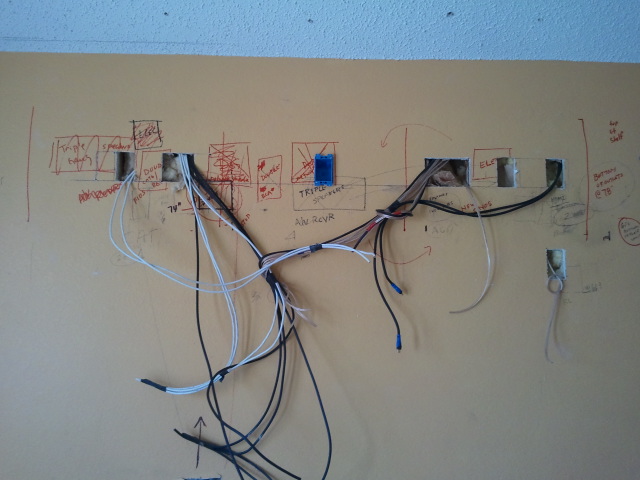
| This is the wall that will house the main media components. Andy had already run four cat6 and four RG6 feeds into the room which they had to move up the wall a bit. This is where all of the other cables running throughout the room are sourced. The big three-gang size hole over toward the right is where all the speaker wires meet. A big ole' mess of wires. |
 |
| This is a view of the ceiling. They had to cut a few holes to run the cables. Fortunately, the bid included sheetrock repair since we figured that some ripping had to be done. |
Andy spent the best part of the weekend terminating each and every cable. He connected one data and one video cable to the main wiring closet and tested out each speaker, hdmi and network cable.
 |
| This is the same main component wall as above but now it is not a spaghetti bowl of cables. Everything has been neatly terminated with a connector plate or connected with keystone jacks and tucked away. The top row of boxes will be inside the component shelving. Starting from the left there is the connector for the outside speakers which will be hooked up to a Sonos Zone Player. Next is the two network cables that run across the room to the other wall. The network capable Blueray player will be connected via an ethernet cable with another connection for future expansion. The next box is a double gang that will contain the four cat6 ethernet and four RG6 video connections back to the main wiring closet. The Blueray player will be connected via a patch cable. The next box (blue) is the power outlet. Then the speaker connection panel. There are enough connections for an 8.2 system. I wired for a 7.2 system, not having a rear center speaker but that would be easy to add. There is an empty box for future expansion and then a box with two HDMI connections that run across the room. The lower row has two speaker connections for the rear surround speakers that will be mounted under the component shelving just above the sofa. Out of the picture in the lower left is one subwoofer connection. |
 |
| This is the other side of the room where most of those wires end up. There are five speaker connections. Up high are the left and right high speakers, Around 36 inches are the left and right front speakers which will be new tower speakers. The lower right is another subwoofer speaker outlet. In the middle of the room is four boxes. From the left, is the two cat6 ethernet connections. The next box contains two HDMI connections for feeding the Blueray player over to the AV receiver plus one extra. Then the connection for the center speaker and finally a power outlet. |
As you can see running a massive amount of media cables is a daunting task. As Joe, the head electrician said, if it was easy, Andy would have done it himself. Andy knew it was going to be a difficult task and is really glad someone else was doing it. Terminating and testing was a piece of cake compared to that.
We are just so excited about the new media/party room.
Not much really happened in the master bath except when Andy went to take a shower Wed morning, there was absolutely no hot water. After washing critical areas in the frigid water he went to figure out the problem. His first thought was that the hot water was turned off when they were working on the master shower plumbing on Tues. Well, the water heater was heating the water just fine. It was perplexing at first. However, Andy realized that the plumber installed new valves in the shower and hooked them into the water supply so he figured that somehow the valve was mixing cold and hot water and putting it back into the system. Well, when RHD's supervisor came, they discussed it and Daryl called the plumber. Well, it turns out that the new valve has a cartridge inside that doesn't ship until the trim kit ships. Without the cartridge to control the flow of water, it was doing exactly what Andy thought. Daryl told the plumber to come over before end of day and take of the problem. He was fortunate that he fixed it before Monica came home wanting a hot shower. Actually, she didn't even suspect until sometime later in the evening.
 |
| That lower valve caused the hot water crisis. You can see that the plumber cut and capped the water pipes to prevent the water mixing in the valve and going back into the feed. |
Last post, we showed the issue with the master bath exhaust fan/light. Given the profile of the ceiling and the placement of the cabinet, this ended up being a bit of a challenge. We came up with several alternatives some of which were not great.
 |
| Miguel was able to move the box up almost a foot and extended it out. The fan/light will hopefully clear the cabinet now. |
Some insulation was added to the master bath exterior walls and the electricians hooked up the fan/light.
The HVAC guys were out to relocate the vents.
 |
| The AC vents were extended out to the new walls. |
 |
| The return vent had to be relocated as its former location is where the new base cabinets will be. |
This room had a beam at the peak of the ceiling and it was pretty ugly to boot. We really had no idea if it was structural or decorative. The plan was just to sheetrock under it to just make a flat area. When the electricians took down the old ceiling fan they discovered that the beam was in reality very flimsy.
 |
| This beam is really just a box made out of paneling material. The electricians were surprised that the fan never fell down. |
 |
| With the false beam removed we could see a 2x4 that was attached to the underside of the ridge beam. We needed a place to run electricity to the two new ceiling fans and something to hang them on of course. |
|
| The solution was to mount a 2x10 in place of the beam. This left a space to run the wiring for the ceiling fans to hold the mounting boxes which can be seen in the picture. This new flat beam will just be rocked over. This is one of those cases of un-forseen issues that result in an additional work order (AWA) but, fortunately, it was fairly small and also included the labor to add a door to create a storage area above the cabinet nook. |
We also mentioned in the last post about the issue with the dryer vent. Even though it has been nearly a year and half since the original addition, RHD did fix this for us. The HVAC guys did a fantastic job of installing a rigid vent pipe up through the roof replacing that bunched up flexible vent that ran up and down the attic rafters to be vented out the soffit. They found that it was totally clogged up with moisture and wet dryer lint.
 |
| The new dryer vent. The HVAC guys did a great job on this even using mastic on all the joint and at the ceiling. They even directed it a bit away from the other vent pipe to not have any interference with flashing. What used to take several cycles to dry can now be completed in one cycle. Looking forward to getting the new washer/dryer installed. |
Next week should be the installation of the new windows in the media room. Hopefully the repair of sheetrock and texture work will start. We are also getting a quote to remove the popcorn from the master bedroom and re-texture.
Most of the work in the master bath will probably have to wait after the installation of the tub which will arrive on 3/30 and be installed on 4/2. However, the tile has been ordered for the master bath. Andy needs to pick up the tile for the media room backsplash. Not sure if they will get to painting this week. We're hoping that they will make some good progress on the media room while the master bath is kind of stalled.


Slow and steady wins the race! I'm sure things will become more fast and furious when the tub arrives. Monica wrote this post, right? It's obvious by all of the descriptive details. :)
ReplyDelete